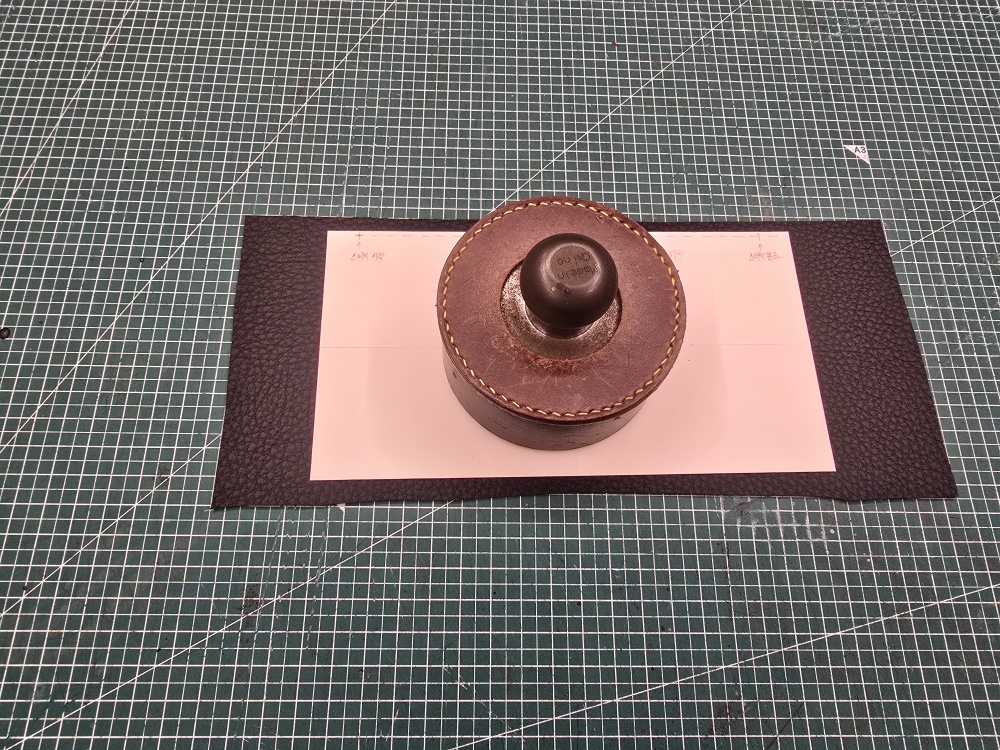
Accurately cutting chrome-tanned leather requires more than simply placing a handmade heavy paper pattern on the leather. Because chrome-tanned leather is soft and flexible, even slight movement of the pattern or leather while cutting can alter the dimensions of the cut piece.
I apply a small amount of leather adhesive along the edge of the paper pattern and position it as though lightly attaching it to the leather. I then place a paperweight in the center and press down by hand near the area where the knife is moving while cutting along the edge of the pattern.
The important point in this method is not to hold the knife perfectly upright. Because the tip of the cutting knife has an angled shape, the knife must be tilted approximately 10 degrees away from the pattern to produce a clean 90-degree cut edge.
Temporarily Adhere the Pattern When Cutting Chrome-Tanned Leather
Chrome-tanned leather is often softer and more flexible than vegetable-tanned leather, so simply placing a pattern on top may allow either the leather or the pattern to shift during cutting.
To prevent this, apply a small amount of leather adhesive along the edge of the paper pattern. Do not spread adhesive across the entire pattern; use only enough to prevent the edges from lifting or moving during cutting.
Place the adhesive-coated pattern on the leather, confirm its exact position, and press it down lightly. Once the pattern is secured to the leather, place a paperweight in the center to prevent the entire pattern from rotating or shifting.
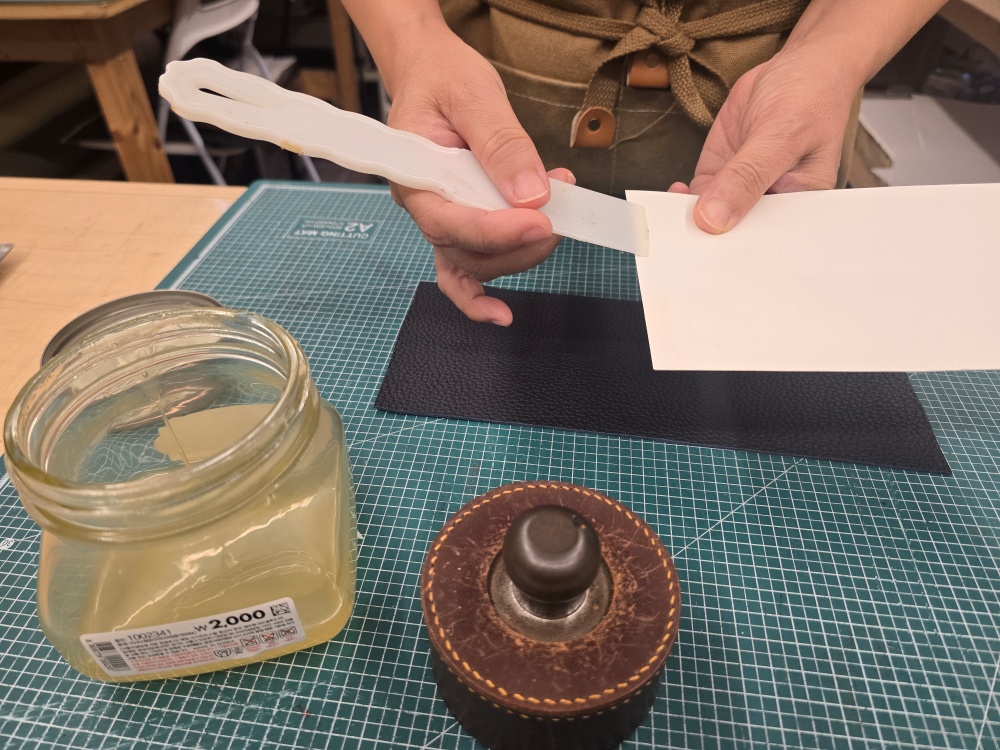
Excessive adhesive may leave residue on the leather surface or cause problems when the pattern is removed. Before cutting the actual piece, test the amount of adhesive on a scrap of the same chrome-tanned leather.
Secure the Pattern with Both a Paperweight and Your Hand
The leather adhesive prevents the pattern edge and leather from sliding against each other. The paperweight placed in the center prevents the entire pattern from rotating or moving significantly.
Press down by hand near the area where the knife is moving so that the section currently being cut does not lift. The paperweight secures the center, while your hand prevents movement along the edge being cut.
As the knife moves forward, the hand pressing the pattern must also move to the next position. Do not move your hand while the knife is still cutting. Stop the knife first, reposition your hand, press the pattern down again, and then continue cutting.
Always keep your fingers inside the pattern and away from the knife’s path. Press close enough to the cutting area to secure the pattern, but keep your fingers safely within the pattern edge.
Keep the Knife Blade Against the Pattern Edge
After securing the pattern with adhesive and a paperweight, keep the knife blade in contact with the edge of the paper pattern throughout the cut.
If a gap forms between the blade and the pattern, the leather will be cut larger than the pattern. If the blade cuts underneath the pattern, the leather will be cut too small and the edge of the paper pattern may also be damaged.
Use the pattern edge as an exact cutting guide. Do not press the knife so forcefully against the pattern that it cuts into the paper; follow the outline with steady, controlled pressure.
Why the Knife Is Tilted Approximately 10 Degrees Outward
The cutting knife used in this method has an angled tip. If the knife is held perfectly upright against the leather surface, the actual cutting edge may pass through the leather at an angle and fail to produce a 90-degree cut edge.
To compensate for the angled tip, tilt the upper part of the knife approximately 10 degrees away from the pattern. This allows the angled cutting edge to pass through the leather while producing a cut surface close to a true 90-degree angle.
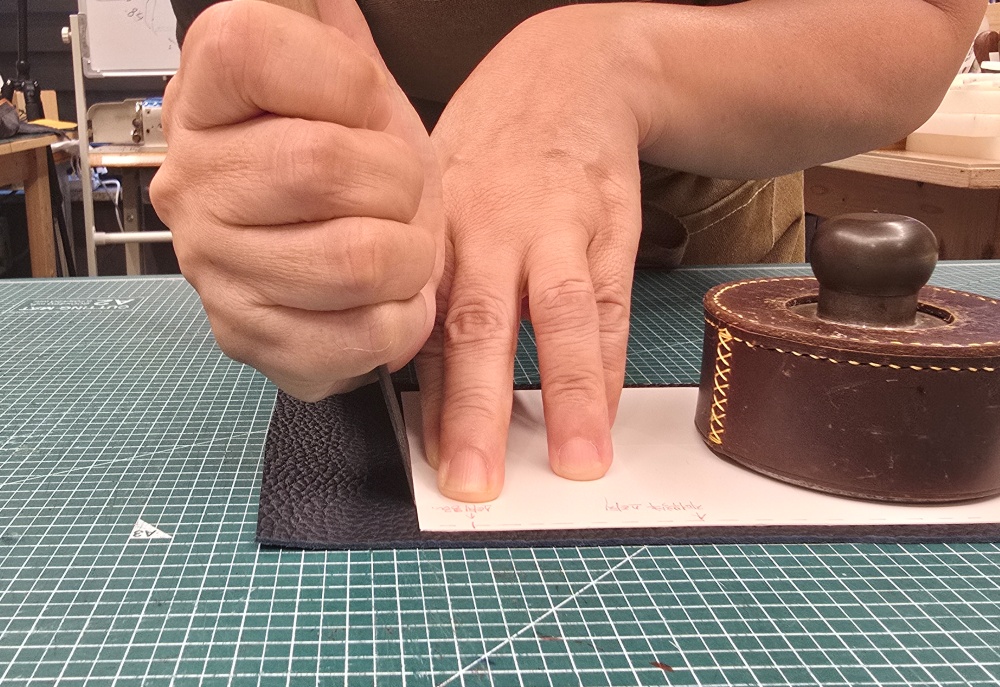
The approximate 10-degree angle is not a universal rule for every cutting knife. It is the working angle suited to the tip shape and sharpening condition of the knife used in this method.
When using a new knife or a blade with a different shape, make a test cut on scrap leather and inspect the cut edge. The correct angle should be determined by whether the actual leather edge forms a 90-degree angle, not by the knife’s appearance alone.
Cut Straight Lines Without Changing the Knife Angle
When cutting a straight line, keep the blade against the pattern edge and move it forward while maintaining the approximately 10-degree outward tilt.
If your wrist turns inward or outward during the cut, the edge angle may differ between the beginning and end. Instead of moving the knife by twisting your wrist, allow your arm to follow the cutting direction.
Do not overreach when cutting a long straight line. Stop the knife, reposition your body and the hand holding the pattern, and then continue cutting at the same angle.
Create Curves by Connecting Short Straight Cuts
A curve is not cut by sweeping or bending the knife around the curved edge of the pattern. Circles and curves can be understood as a continuous sequence of short straight lines.
First, cut a short section in a straight line. Then rotate the entire workpiece approximately 5 degrees without allowing the leather and pattern to shift against each other, and make another short straight cut.
Rotate the workpiece approximately 5 degrees again and cut the next straight section. Repeating this process connects the short straight cuts into a smooth line that follows the curve of the pattern.
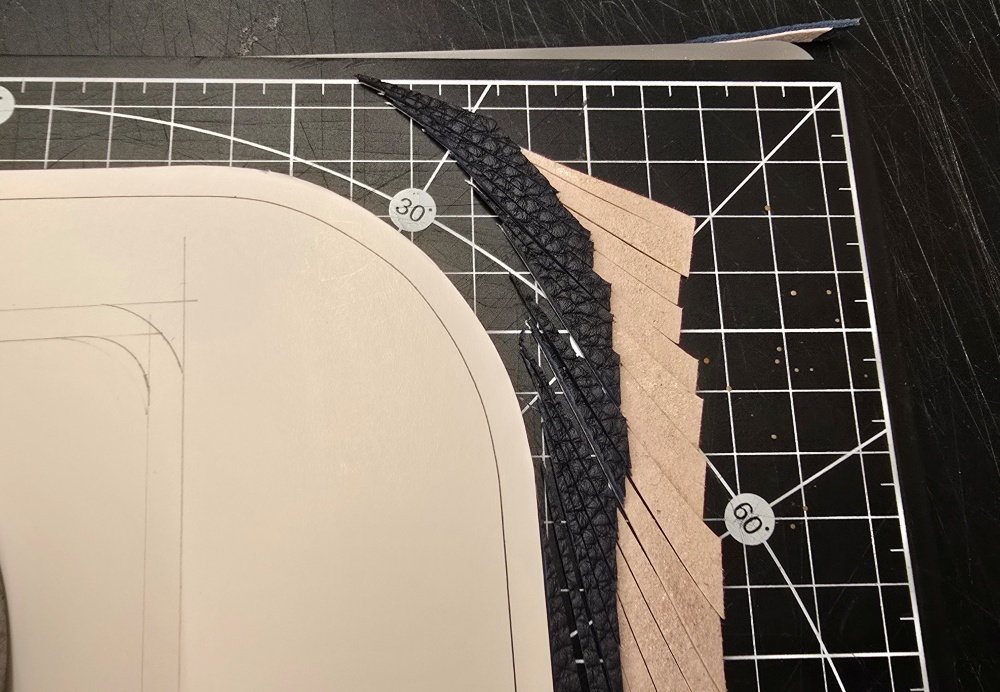
The tighter the curve, the shorter each straight cut should be and the smaller each rotation should become. Rotating the workpiece too far or cutting overly long sections can create an angular curve or cause the blade to move away from the pattern edge.
The key is not to force the knife to twist through the leather to create a curve. Keep the knife moving in the same straight direction at the same tilt, and gradually rotate the workpiece with the leather and pattern attached to change the cutting direction.
Cut Circles Using the Same Principle
Cutting a circle is not a matter of drawing one continuous round line with the knife. It is done by repeatedly making a short straight cut, rotating the workpiece slightly, and making another straight cut.
For example, cut one short section in a straight line and then rotate the workpiece approximately 5 degrees. Cut another straight section of the same length and rotate the workpiece again.
Repeating this process consistently connects many short straight lines to form a circle. The length of each section and the amount of rotation must remain consistent to prevent any part of the circle from protruding or receding.
As with straight cutting, keep the knife tilted approximately 10 degrees away from the pattern. Even as the workpiece rotates, the relationship between the knife and the pattern edge must remain unchanged.
Connect Two Straight Cuts at One Exact Point to Form a Corner
At a corner where two straight lines meet, cut the first line precisely to the corner reference point and then lift the knife.
Rotate the workpiece and begin the second straight cut from the new direction. The two cutting lines must meet at one exact point on the corner of the pattern.
If the knife is left embedded in the leather and turned sharply around the corner, the tip may pass beyond the pattern or damage the pattern edge.
If the first and second cuts do not meet, leather fibers may remain at the corner. If either cut extends beyond the reference point, an unnecessary knife mark may remain on the finished piece.
Check Cutting Accuracy from Both the Front and Back
After cutting, do not judge accuracy by examining only the front surface. Check whether the outlines of the pattern and the cut leather match from both the front and the back.
First, inspect the front with the pattern still attached. No leather should be visible beyond the edge of the pattern. If leather is visible, the blade moved away from the pattern and cut outside the intended line.
Next, turn the cut piece over and inspect the back. No part of the paper pattern should be visible beyond the edge of the leather. If the pattern is visible, the blade cut inward and made the leather piece too small.
When the piece has been cut accurately, no leather will be visible outside the pattern from the front, and no pattern will be visible outside the leather from the back. The edges of the pattern and leather must align precisely on both sides.

Inspect the cut edge as well. It should form a 90-degree angle without leaning to either side so that the edges of multiple components align correctly during bonding and stitching.
Post-Cutting Checklist
- Is any leather visible beyond the edge of the pattern?
- Is any part of the pattern visible beyond the leather when viewed from the back?
- Do the outlines of the leather and pattern align precisely?
- Has the leather edge been cut at a 90-degree angle?
- Did the knife angle remain consistent from the beginning to the end of each straight cut?
- Is the curve free from angular or uneven sections?
- Are all sections of the circle connected consistently?
- Do the two straight cuts meet at one exact point at each corner?
- Did the pattern remain securely attached without shifting or lifting during cutting?
- Has the edge of the paper pattern remained undamaged by the knife?
Accurate Cutting Depends on Maintaining the Relationship Between the Pattern and the Knife
The key to cutting chrome-tanned leather with a pattern is to secure the pattern with leather adhesive and a paperweight while keeping the knife blade in contact with the pattern edge.
Instead of holding the knife perfectly upright, tilt it approximately 10 degrees away from the pattern to compensate for the shape of the cutting edge. Maintaining this angle allows the cut leather edge to form an accurate 90-degree angle.

Curves and circles do not require a separate sweeping knife motion. They are created by repeatedly making short straight cuts and rotating the workpiece approximately 5 degrees to connect those straight cuts into a continuous curve.
A deeper explanation of these cutting principles can also be found in “ Why Leathercraft Should Be Learned Through Principles, Not Just Techniques.”
When the leather has been cut accurately, no leather will be visible outside the pattern from the front, and no pattern will be visible outside the leather from the back. Only when both conditions are met can the pattern dimensions be considered accurately transferred to the leather.